DIY Harry Potter Quidditch Pitch Ornament
For almost a year now, I have spent whatever free time I could find on one major crafting project- my harry potter Christmas tree. Seeing how much I love all things Potter and my obsession with the holiday season, it was only a matter of time until I married the two together. I have been working on ornaments for it and planning throughout the year but now that the tree is finally up I only have a few finishing touches to make. A full tree reveal and more DIY ornaments will be coming shortly, but today I wanted to share my most recent project with you. I made a miniature version of a quidditch pitch, complete with stadium towers, turf, goalposts, and a flying broom!


My original concept to make a quidditch pitch diorama style ornament was inspired by this empty plastic jar style ornament I found at the dollar tree.
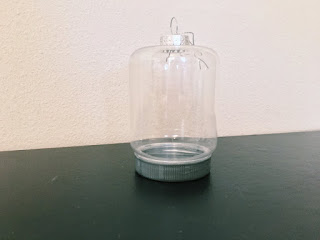
I bought this before the Christmas season had really kicked off and when I went back to get more for another project I couldn't find any. You can always try looking in your local stores but I also found something similar online here.
This was the first time I had made anything similar to this so I found that my first instincts were not necessarily the best way to go. I made and suspended the broom first but found once the goalposts were in that I had to restring it anyways. I would recommend creating the stadium towers to go around the ornaments base first.

I actually found this to probably be the most tedious part of the whole project. I began with the sketch you see on top, I made the total length of the drawing the approximate circumference of my ornament and adjusted the height to be a little over halfway up the side. Each tower had a simple checkered design I created first with a ruler and pencil then went over with acrylic paint and a fine point sharpie. I did this on thick paper designed to be painted out (a page ripped out of my mixed media sketchbook) so that the paper didn't warp when I used the paint.
Then I carefully cut out each tower and used hot glue to attach it to the base of the ornament as far down as I could before it started to curve.
Next I wanted to make the inside of the ornament look as much like the pitch as possible so I used a bit of artificial turf I found at Walmart in the base after I unscrewed it before I put the goal posts in. This didn't end up being very visible in the end but did make it easier to secure the posts. I also used the same fake grass around the bottom after getting the bottom screwed back on. I found this in the section with the Christmas village decorations, I couldn't find the same pack online but they have a similar one available here.

To create the mini goalposts I took toothpicks and cut the sharp ends off, making sure that there were two longer posts and four shorter ones, and then attached small rubber o-rings I found in the garage with a bit of hot glue. I painted both pieces with a metallic gold paint before using a small drop of hot glue to attach them to the lid. To make it look as authentic as possible I tried to make it so there were two cluster of posts on either end of the pitch, with a taller one in the middle and two shorter ones on either side of it.
Then I just cut a bit of the turf to place around the base and again used hot glue to keep it in place. It wanted the turf to be more visible than just inside the ornament and look like if you had a view of the pitch from far off.
Then all that's left is to create the world's smallest broom!


I used a small piece of a twig and carefully removed the bark with a pocket knife to create the main piece to start with. Then I used a bit of some pine needles I picked up around my neighborhood and cut them really short before hot gluing them around the base in a few layers. I ended up doing two layers about a half an inch from the bottom with pieces of different length pine needles going all the way up. You don't need to worry too much about getting the length right at first, I ended up cutting quite a bit off the end after gluing them down.
Next I cut a small strip of metallic tape and used hot glue (surprise, surprise) to hold it down. Then just a small bit of brown acrylic paint over the stick and we're almost ready to go.


In order to create the small handles coming off the side I used a piece of small copper jewelry wire and wrapped it around the broom twice before turning it up at the ends. This was one of the many supplies I had on hand from when I made larger brooms which are also featured on my tree!
I also used these handles in order to secure the broom in place by tying a small knot in fishing line around the wire so I could loop it through the top of the ornament.

It's a bit hard to see but I essentially took the line and pushed it up through one hole, down the other, and then up once more before tying a knot to secure it.
And that's it!

I love that the final ornament has so many magical elements and pays homage to what is certainly the best sport in the wizarding world.
Please let me know what you think and stay tuned for many more harry potter related crafts and ornaments that will be coming very soon. And of course, to see the final tree in all it's glory! Thank you very much for reading!
Comments
Post a Comment